
There are numerous articles on the web and tons of literature on how to squat but many of them are in a pretty complex language that may be difficult to understand for most. A squat is one of the most basic movements that most people tend to do wrong 90% of the time. The purpose of this post is to explain the “Why and How” in simple words so that you were able to immediately apply and correct your own technique if necessary.
Let’s start with the list of the most common mistakes:
-
Forward lean
-
Heels come off the floor
-
Knees falling inwards
-
Not going below parallel
Let me begin by saying that most of these mistakes can be fixed by only two moves:
-
Putting your feet slightly wider than your hips
-
Turning your toes out to 30-45 degrees angle
Now stand up and give it a try? Feel the difference?
The main reason for that is the anatomy of our hips, the hip joint in particular. In my practice I train people of all fitness levels and ages, so far I can recall only several clients that were able to squat properly with their feet pointing straight forward.
When it comes to your skeletal anatomy there are several major factors that will determine how you move. The hip socket itself is positioned differently in all people (higher/lower, more towards the front or the back of your body), so the angle and depth of the hip socket, the length of the femoral neck and the angle of the femoral neck in relation to the femur will greatly determine how your body moves. That will also determine whether you going to have a so-called “butt wink”.
Your skeletal anatomy cannot be changed, however, there is another important thing to consider. Your flexibility. Flexibility is something that you should work on a regular basis (if not every day then at least 4-5 times a week). Lack of flexibility in any muscle group will lead to compensation from other muscles and as a result, a wrong technique of the squat. Remember, everything in our bodies is connected and depends on each other. If one link is off, something else has to assume and distribute the load in order to perform the task. So put some work in and stretch on!
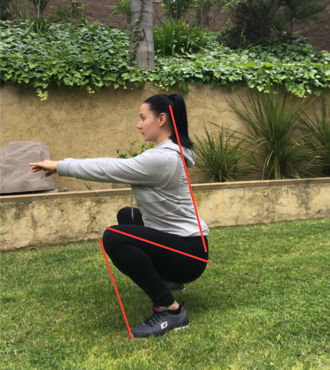
Most of you have heard that when you squat you shouldn’t go below parallel and that your knees should not go forward. I am honestly, not sure where this came from and how it ended up and many personal trainer educational books. What I do know, is that this advice is not appropriate for most people who have no pre-existing conditions that can be worsened by squatting low. Here is why.
First of all, our knees designed and meant to move beyond the toes when you squat. It’s literally impossible to squat properly without your knees going beyond the toes line. I mean look at the squat of the baby and tell me where their knees are going? Additionally, if you stop your knees beyond the toes, it will require you to lean forward in order to keep the balance, which under the load (like a barbell on your shoulders), will create more pressure on your back and may result in a back pain.
Considering you don’t have any pre-existing conditions that affect your knee joint, and correct technique of the squat, you should not feel any pain in your knees when you go below parallel. If you do feel the pain, it is most likely due to either lack of flexibility in one or several muscles (quads, calves, hip flexors or IT band) or weak tendons and ligaments (that need to be strengthened).
Now let’s look at why you should squat below parallel. The tension put on your knees during the descending part of the squat increases as you go all the way to 90 degrees angle and starts to decrease once you pass that point. In other words, you are putting a lot of pressure on the knees without giving them a chance to release the pressure by passing the parallel mark.
Of course, there are cases when squatting to just parallel or slightly above is the only option due to injury or other physical limitation. However, most people should be able to squat low as it not only will strengthen your knees and back, but also provide better activation for your glutes.
Now let’s try to sum it up and go through the major points of the squat step by step
-
Start with your feet slightly wider than your hip width (find a comfortable position that feels natural)
-
Point your toes out to 35-45degrees and bring your heels in slightly
-
Keep your chest up and lower your hips as if you are trying to sit on the chair behind you
-
Keep your weight on the heels the entire time but do NOT lift your toes off the floor
-
Press your knees out so that they follow your toes
-
Keep a constant tension in your upper and lower back (try to arch – not round)
-
Without bouncing at the bottom reverse the movement while keeping your body as upright as possible.
-
Ta-Da! That was one rep, let’s do ten more 😉
When done correctly, you shouldn’t feel pain in your back, knees or ankles. A squat is a great move that should be incorporated in some form in any well-rounded fitness program. Learn how to do it correctly and you are going to rip the benefits.
I hope this clears up some confusion and will help you build a better, stronger body (and booty). Stay strong and active my friends. Let me know if you have any questions and I will talk to you soon!